

How to Restore Headlights with the Flitz Headlight Restoration Kit
Posted by Flitz Premium Polishing Products on 12th Jan 2026
Cloudy, yellowed, and hazy headlights are one of the first ways your car truly shows age. You might think it’s inevitable, but it’s not—and it’s more than just a cosmetic issue.
Over time, degraded headlights reduce light output and limit visibility, making nighttime driving more difficult and dangerous. Ignore it? The headlights only get worse, and replacement headlights are expensive.
Don’t worry, Flitz has got you with everything you need to know to restore those headlights at home, without a big investment.
Why Headlights Become Cloudy or Yellow
Why do headlights get yellow anyway? It has to do with the materials they’re made from. Most modern vehicles feature polycarbonate or acrylic headlight lenses. These plastics are durable and impact-resistant, making them great for headlights.
The drawback of these materials is that they can be vulnerable to long-term exposure to weather and temperature changes, as well as to UV rays from the sun. Factor in road debris, airborne contaminants, and chemical residue from washing (and driving through road salt, ice melt, and worse…and eventually your headlights are going to cloud.
UV exposure breaks down the outer layer of the headlight lens. The surface becomes rough and discolored, causing light to scatter rather than pass through cleanly and clearly. The result is that dull, hazy, cloudy appearance that headlights get after a few years.
So how do you beat it? You could replace your headlights, but that’s not always realistic (and hard to justify if the headlights are still functioning). Do you accept it and settle for less clear light?
Flitz offers a straightforward, affordable solution: the Flitz Headlight Restoration Kit. The kit has everything you need to remove oxidation and that damaged surface layer, restore clarity by polishing, and protect the plastic to slow future degradation.
When should you restore your vehicle’s headlights? The truth is, it’s never too soon, but it’s particularly a good idea if your lenses are fogged, yellow, dull, or cloudy. Don’t put it off, especially if you’re noticing some reduced visibility at night.
If your headlight lenses are cracked, deeply scratched, or otherwise damaged, replacement may be the best option. But for most surface-level degradation, restoration is effective and way more cost-effective (and dare we say, a little bit fun and satisfying).
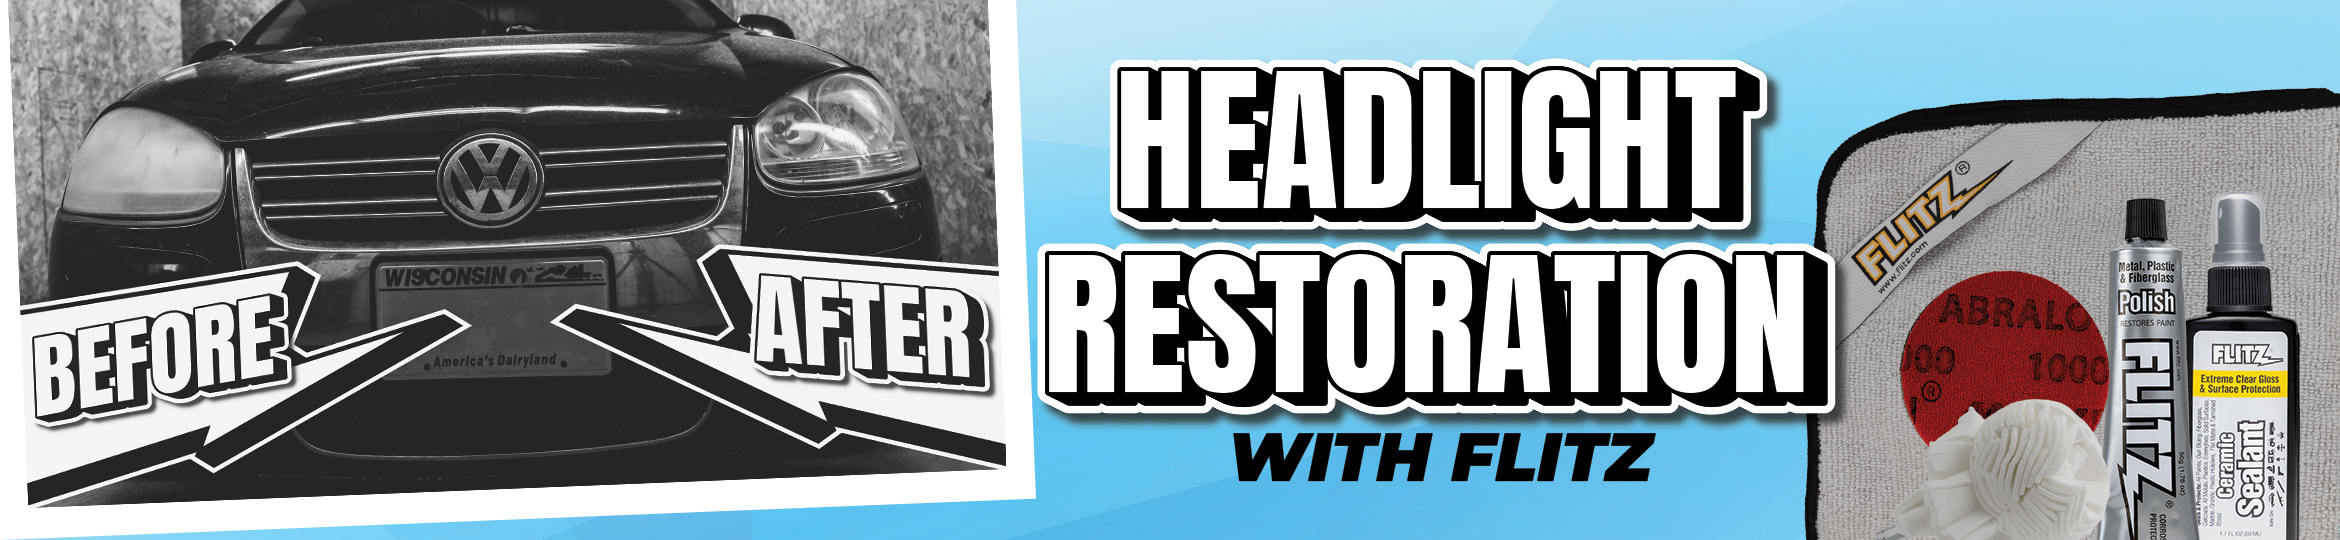
What’s Included in the Flitz Headlight Restoration Kit
The Flitz Headlight Restoration Kit is a great all-in-one option for restoring your headlights and keeping them clear and bright in the future. You get all the essential tools you need to bring your headlight lenses back to life, fast.
In the Flitz Headlight Restoration Kit, you get:
- Flitz Paste Polish
- Flitz Buff Ball
- Flitz Ceramic Sealant
- Abrasive Scuff Pad (to prepare heavily oxidized lenses)
It’s everything you need to restore headlines in one affordable, easy-to-use kit. You can clean, polish, and protect your headlights in one afternoon, no sweat.
Using the Flitz Headlight Kit to Restore Vehicle Headlights
So how do you use all of the items in your kit to polish your headlights? We’re so glad you asked. Here’s the step-by-step:
Step 1: Clean the Lens
Wash the headlight lens with soap and water to remove any dirt, grime, and surface residue. Dry them thoroughly (use a microfiber cloth for best results). Although Flitz Polish and Ceramic Sealant are safe for use on cars, you may want to mask off the area to protect it during the restoration process.
Step 2: Prepare the Surface
If your headlights are seriously oxidized or discolored, you may need to scuff them up using the included abrasive scuffing pad. It sounds counterintuitive, but this step removes the degraded outer layer of the lens plastic so you can polish more effectively.
Work evenly across the lens surface. Don’t worry—the lens often looks worse at this stage of restoration, but that’s normal and expected.
Step 3: Polish to Restore Clarity
Here’s where the fun begins—apply a small amount of Flitz Paste Polish to the Buff Ball (attached to your drill). Use moderate pressure to polish the lens. Work one at a time, in controlled sections.
The polishing process smooths the surface and restores transparency by polishing those microscopic surface irregularities. The Buff Ball works with your drill to speed up the process, helping you get consistent results without excessive heat buildup.
For heavily degraded lenses, you may need additional polishing passes to get the restored lens you’re aiming for.
Step 4: Protect the Restored Lens
Clean, polish…and then protect. Once you’ve restored clarity to your headlights, apply Flitz Ceramic Sealant to lock in that finish. Ceramic Sealant gives a protective, ceramic-like coating to protect the lens from future UV exposure and wear.
Taking the step to seal and protect extends the results of your hard work (and keeps you from having to repeat the process frequently).
All in all, the restoration time will vary based on the condition of your headlight lenses, but for moderately degraded headlights, you’re looking at under an hour of labor from start to finish. Severe oxidation may take a little more prep and polish, but no matter what, it’s a satisfying job with a great payoff.
For best results, follow these headlight restoration tips:
- Work in the shade to avoid heat buildup.
- Keep your polishing pressure consistent.
- Avoid dry buffing the lights; always use a polish.
- Clean off any residue between steps (using a microfiber cloth).
- Follow protection steps with Ceramic Sealant to lock in results.
The Flitz Headlight Restoration kit makes an excellent gift for car enthusiasts and anyone who loves a good clean shine. It’s an ideal way to help your loved ones drive a little more safely at night.
Keeping Headlights Restored and Clear
Now that your headlights look like new, you’re going to want to keep them that way. Fortunately, you don’t need a lot of heavy-duty maintenance, especially if you use the Flitz Ceramic Sealant to lock in and protect the shine.
Wash the lenses regularly with mild soap, avoiding harsh chemicals and abrasive cleaners. If you start to notice a little yellowing or clouding, reapply Flitz protective products as needed to slow UV degradation.
While you can’t keep your vehicle out of the sun all the time, it’s a good idea to park in shaded areas when possible, as the sun is the prime culprit for lens degradation.
For headlights that are extremely degraded, pitted, or still uneven after basic prep, you may need additional sanding work before you polish. For a more in-depth restoration method, including detailed sanding guidance, see our advanced guide for restoring faded and fogged headlights. For most headlights, the Flitz Headlight Restoration Kit will have everything you need to get clear, working headlights fast.
Whether you’re maintaining your daily driver, preparing a vehicle for sale, or just taking care of your beauty in the garage, the Flitz Headlight Restoration Kit gives you a practical solution that works quickly and easily.
If you have questions about Flitz products, we’re here to help! We have an array of products designed to help you keep your whole vehicle looking sharp. Explore our easy-to-use products today and be amazed at what a shine can do for your headlights and your car.